
Transforming fresh cherries into a jar of vibrant, sweet, and tangy cherry jelly is easier than you think. This guide is packed with detailed instructions, helpful tips, and answers to common questions to ensure your jelly-making experience is smooth and rewarding. Whether you use sweet cherries for a mild flavor or tart cherries for a tangy kick, this recipe is customizable and perfect for all occasions.
Get ready to enjoy a homemade delight that can elevate your breakfast, complement your desserts, or make a heartfelt gift.
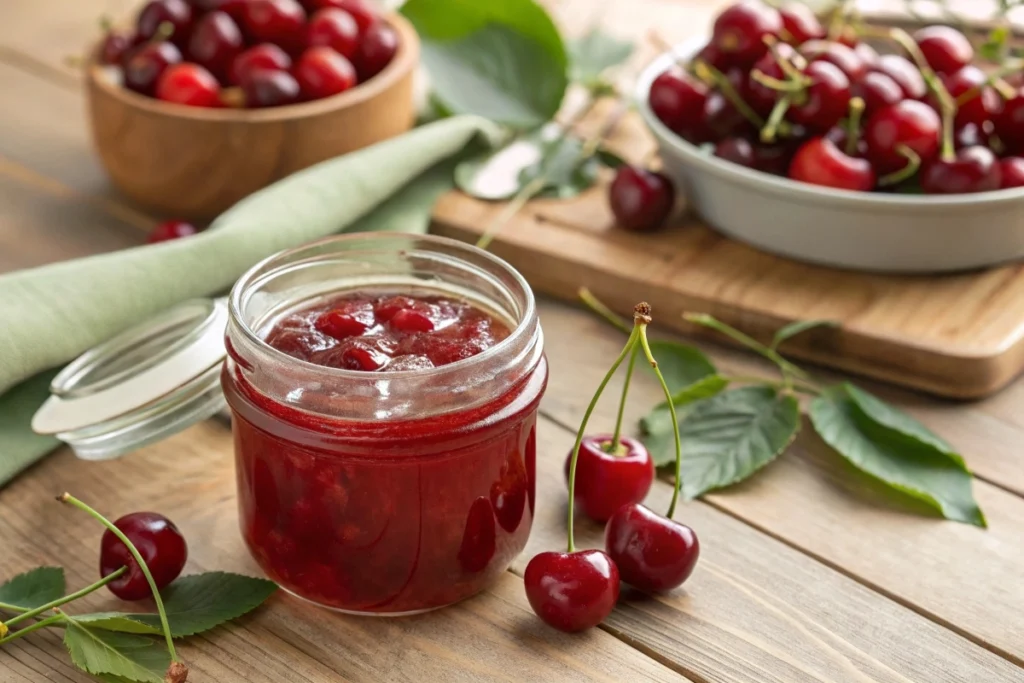
Table of contents
Ingredients and Tools for the Perfect Cherry Jelly Recipe
Every great recipe starts with the right ingredients and tools. Here’s everything you need to get started.
Ingredients for Cherry Jelly
The recipe below yields about six small jars of cherry jelly. Adjust quantities if needed, but remember that precision is key for the perfect consistency.
| Ingredient | Amount | Notes |
|---|---|---|
| Fresh cherries | 4 cups | Sweet or tart, pitted |
| Sugar | 4 cups | Adjust to taste, but keep proportions for setting |
| Lemon juice | 2 tbsp | Balances sweetness and aids thickening |
| Liquid pectin | 1 packet | Speeds up the jelling process |
Tip: Use tart cherries if you want your jelly to set naturally, as they are naturally higher in pectin. For a sweeter jelly, opt for sweet cherries, but consider adding extra pectin for the right texture.
Essential Tools
Making cherry jelly requires a few basic kitchen tools. These items ensure the process is efficient and the results are delicious:
- Saucepan: A large, heavy-bottomed pan to prevent scorching while cooking.
- Jelly bag or cheesecloth: Essential for straining the juice to achieve a clear jelly.
- Sterilized canning jars and lids: Necessary for preserving the jelly.
- Ladle and funnel: Makes filling jars easy and mess-free.
- Water bath canner: Ensures a safe seal for long-term storage.

Step-by-Step Guide to Making Cherry Jelly
This detailed step-by-step guide will walk you through the entire process, from prepping the cherries to sealing the jars. Follow along carefully to ensure the best results.
1. Prepping the Cherries
Start by washing the cherries thoroughly under cold water. Remove any stems, leaves, or debris. Next, pit the cherries using a cherry pitter for speed or manually with a small knife.
Tip: Save the pits! They can be used to make a fragrant cherry pit syrup or even for crafts. Learn more about creative ways to repurpose cherry byproducts in this cherry chocolate cake recipe.
Once pitted, place the cherries in a large saucepan. Lightly mash them with a potato masher or the back of a spoon to release their juices.
2. Cooking the Cherry Mixture
Add sugar and lemon juice to the mashed cherries in the saucepan. Stir well to combine the ingredients. Bring the mixture to a rolling boil over medium-high heat, stirring constantly to prevent the sugar from burning. The aroma at this stage is irresistible, filling your kitchen with the scent of fresh cherries.
Pro Tip: Keep a close eye on the mixture. A rolling boil is a vigorous, bubbling state that cannot be stirred down. It’s essential for activating the pectin and ensuring your jelly sets properly.
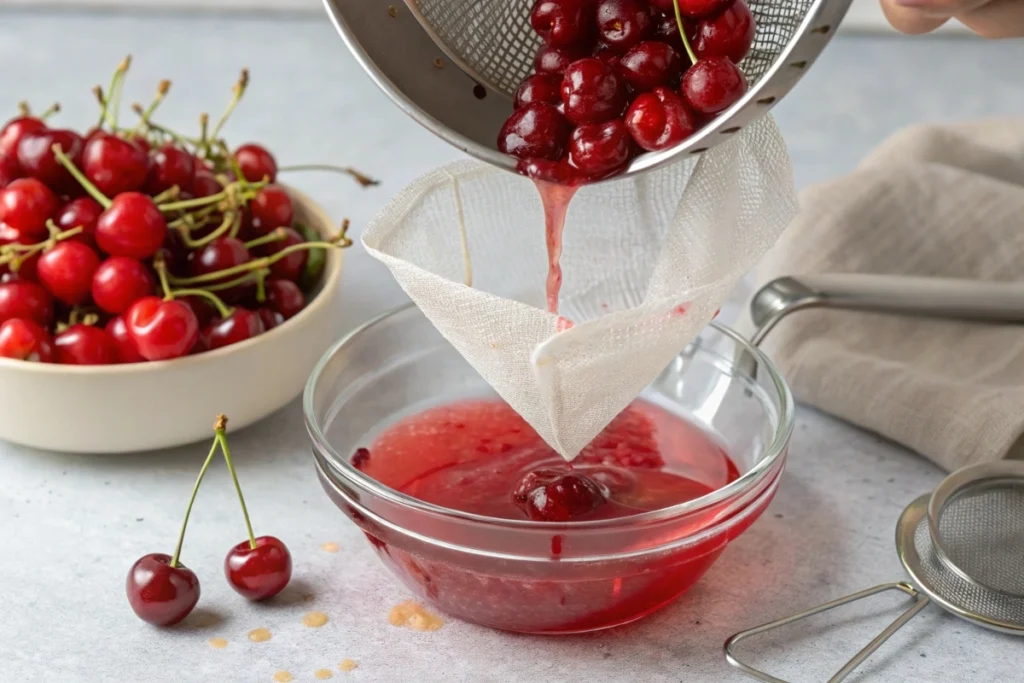
3. Straining the Juice
Once the mixture has boiled for about 5-7 minutes, remove it from heat. Set up a jelly bag or a double layer of cheesecloth over a large bowl. Pour the hot mixture into the bag or cloth and allow the juice to drip through naturally. Resist the urge to squeeze the bag, as this can make your jelly cloudy.
4. Preparing the Jelly Base
Return the strained juice to the cleaned saucepan. Add liquid pectin if you’re using it, and stir to combine. Bring the juice back to a rolling boil, stirring constantly. Boil for 1-2 minutes to fully activate the pectin. Skim off any foam that forms on the surface for a clearer jelly.
Did You Know? Pectin is a natural fiber found in fruits, especially apples and citrus peels. While tart cherries contain enough natural pectin for jelly-making, sweet cherries often require a boost from commercial pectin.
5. Filling and Sealing the Jars
Prepare your sterilized jars by placing them on a clean towel. Using a ladle and funnel, carefully fill each jar with the hot jelly, leaving about 1/4-inch of headspace at the top. This small gap allows for expansion during processing.
Wipe the rims of the jars with a damp cloth to ensure a clean seal. Place the lids on the jars, screw the bands on until fingertip tight, and process the jars in a water bath canner for 10 minutes.
Pro Tip: For safety, always use sterilized jars and lids. Improperly sealed jars can lead to spoilage. If you’re unsure about the process, check out this comprehensive canning guide for additional tips.
Why Lemon Juice is Crucial
Lemon juice plays an essential role in jelly-making. Its acidity helps balance the sweetness of the sugar and enhances the tartness of the cherries. More importantly, it lowers the pH of the mixture, creating an ideal environment for pectin to gel.
Alternatives: If you don’t have lemon juice, white vinegar or citric acid can work in a pinch. However, these alternatives may slightly alter the flavor profile of your jelly.
Creative Variations and Advanced Tips for the Perfect Cherry Jelly Recipe
As you refine your cherry jelly-making skills, exploring creative variations and applying expert tips can help you achieve a distinctive jelly every time. Whether you want to experiment with flavors, enhance the texture, or address common issues, this section will guide you through the possibilities.
Flavor Variations for Cherry Jelly
1. Experiment with Fruit Combinations
Adding complementary fruits can elevate your cherry jelly’s flavor profile. For instance:
- Strawberries: Add strawberries for a classic summer-inspired jelly. Their sweetness pairs beautifully with the tartness of cherries.
- Blueberries: Blueberries enhance the jelly’s texture and provide a rich color.
- Apples: Apples are high in natural pectin, reducing the need for commercial additives.
Pro Tip: Substitute up to 25% of the cherries with other fruits while maintaining the original sugar and juice ratio.
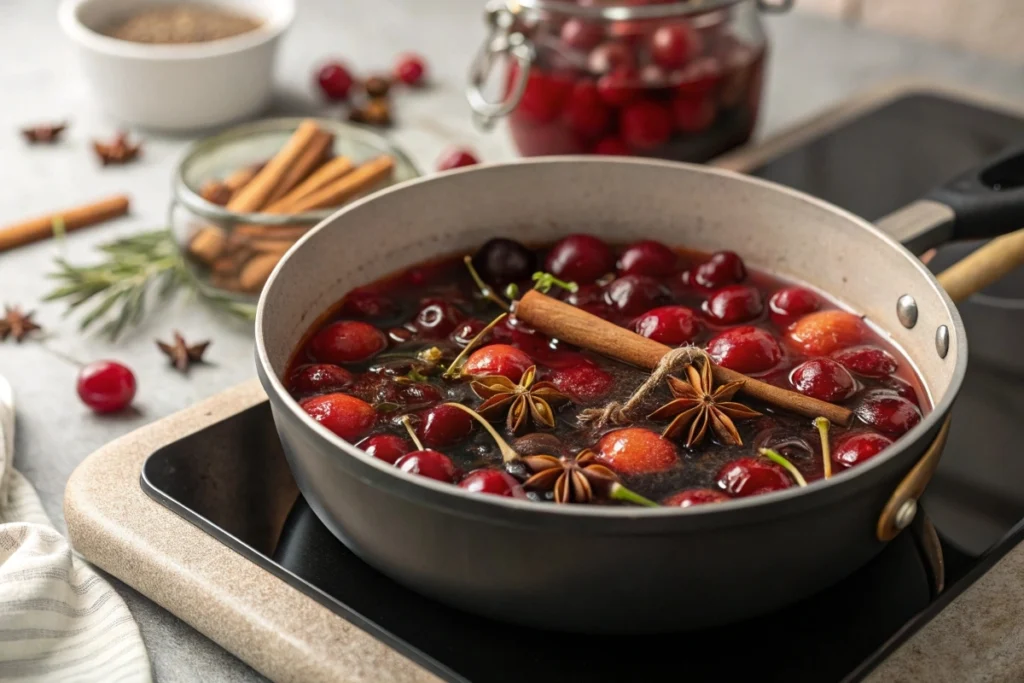
2. Spice Infusions for Warm Notes
To add depth, simmer spices with the cherries before straining. Some excellent options include:
- Cinnamon Sticks
- Vanilla Pods
- Star Anise
Strain the spices out with the juice to achieve a subtle but noticeable flavor infusion.
Expert Tips for Perfect Jelly Every Time
1. Get the Temperature Right
Use a thermometer to ensure your jelly reaches 220°F (104°C). This is the optimal temperature for the pectin to activate and the jelly to set.
Tip: If you don’t have a thermometer, use the chilled plate method. Place a spoonful of jelly on a frozen plate and push it with your finger. If it wrinkles, it’s ready.
2. Adjust Sugar Carefully
Sugar is vital for the jelly’s texture, flavor, and preservation. Reducing sugar without a low-sugar pectin may result in a runny consistency. Always follow the recipe for best results.
3. Avoid Cloudiness
For a clear jelly, resist pressing the jelly bag or cheesecloth when straining the juice. Let gravity work naturally to extract the liquid.
4. Prevent Overcooking
Overcooking can result in a hard, rubbery texture. Stick to the recommended boiling times and monitor closely.
Tip: For an in-depth guide on canning and preserving techniques, check out the cherry chocolate cake recipe, which provides additional insights into handling fruit-based recipes.
Creative Ways to Enjoy Cherry Jelly
Breakfast Favorites
- Spread cherry jelly on toast, bagels, or pancakes for a quick and delightful breakfast.
- Add it to Greek yogurt or oatmeal for a touch of natural sweetness.
Savory Pairings
Cherry jelly isn’t just for sweet dishes. Use it as a glaze for meats like pork tenderloin, roast chicken, or duck. Its tangy-sweet flavor complements these proteins perfectly.
Dessert Enhancements
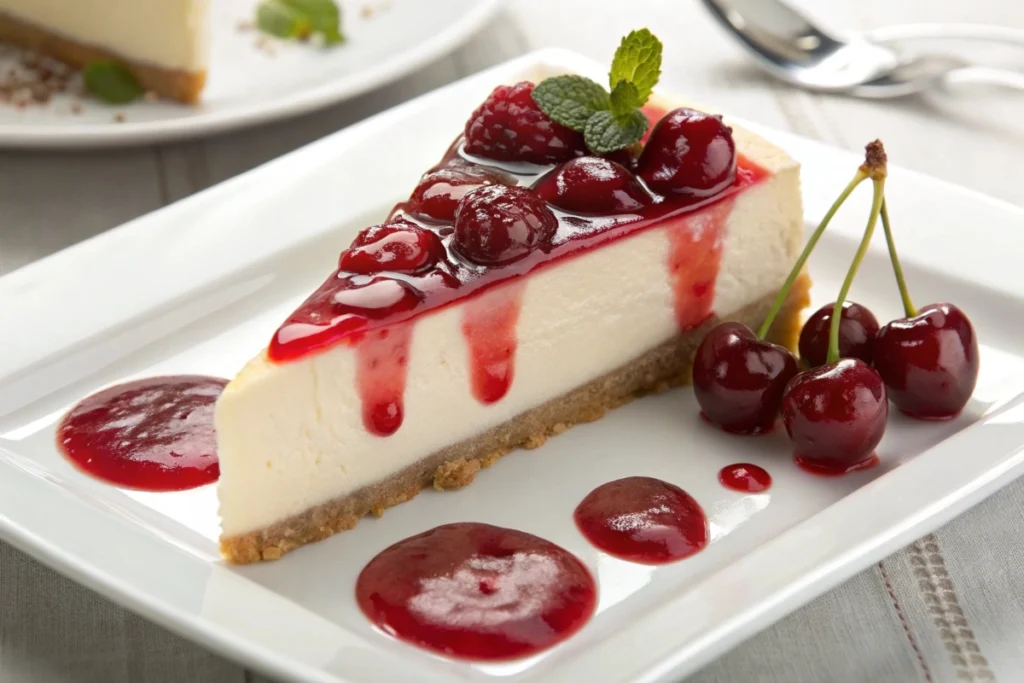
- Fill pastries or layer cakes with cherry jelly for a fruity surprise.
- Drizzle it over ice cream, cheesecakes, or panna cotta for a luxurious finish.
Cherry Jam and Jelly: Everything You Need to Know
Cherry Jam
Unlike jelly, jam retains the fruit’s pulp, giving it a textured and hearty consistency. The versatility of cherry jam is unmatched—it pairs perfectly with toast, biscuits, and even as a glaze for savory dishes.Cherry jam is a thick and flavorful spread made using crushed cherries, sugar, and sometimes pectin.
Pro Tip: If you’re aiming for a smoother jam, consider blending the cherries slightly before cooking. However, if you enjoy chunks of fruit, leave them as is.
Cherry Jam Recipe
To make a basic cherry jam, combine 4 cups of pitted cherries with 3 cups of sugar and 2 tablespoons of lemon juice. Cook the mixture over medium heat, stirring occasionally until it reaches a full rolling boil. Add pectin if needed and boil for one additional minute before transferring the jam to sterilized jars.
Pit Cherries Efficiently
Pitting cherries is often considered the most labor-intensive part of making cherry jam or jelly. Investing in a cherry pitter can save time and effort, especially when working with many cherries.
Steps for Pitting Cherries:
- Wash the cherries in hot soapy water to remove dirt.
- Use a cherry pitter for fast, clean results.
- If you don’t have a pitter, use a straw or chopstick to push the pit through.
Tip: Freeze the pitted cherries for later use if you’re not ready to start cooking.
The Role of Pectin in Cherry Preserves
Pectin is a natural thickener that helps fruit-based preserves achieve the desired consistency. Sour cherries contain more natural pectin than sweet varieties, which means you might not need additional pectin when making sour cherry jelly or jam.
Using Pectin
For beginners, liquid pectin is the easiest to work with. Add it to the boiling fruit mixture and stir to activate the thickening properties. Be sure to bring the mixture to a full rolling boil after adding pectin for the best results.
Sour Cherries: A Star Ingredient
Sour cherries are highly prized for making both jam and jelly due to their bright flavor and natural pectin content. Their tartness balances the sweetness of sugar, creating a perfect harmony of flavors.
Why Use Sour Cherries?
- Sour cherries produce a deep, ruby-red juice that looks stunning in jars of jelly.
- Their higher acidity enhances the jelly’s texture and flavor.
If you’re lucky enough to have a cherry tree in your backyard, sour cherries may already be within reach. Otherwise, frozen cherries are an excellent alternative, particularly when fresh ones are out of season.
Make Cherry Jam and Jelly
Making cherry jam or jelly at home is simpler than it sounds. While jelly involves straining the juice for a smooth texture, jam uses the whole fruit for a chunkier consistency.
Cherry Jelly Using Juice Instead of Pulp
To make cherry jelly, extract 4 cups of juice by simmering pitted cherries and pressing them through a strainer or jelly bag. Mix the juice with 4 cups of sugar and bring it to a boil, stirring occasionally. Add lemon juice and liquid pectin before boiling for one more minute.
Tip: Use tart cherry juice for a sharper, more vibrant flavor.
Canning Cherry Jelly and Jam
Water Bath Canning Instructions
Canning is essential for preserving your homemade jam and jelly safely.
- Sterilize jars, lids, and tools in boiling water or hot soapy water.
- Fill the jars with hot jelly, leaving 1/4-inch headspace. Wipe jar rims with a clean, damp cloth to ensure a proper seal.
- Secure the lids and process the jars in a water bath canner for the recommended processing time, usually 10 minutes.
Tip: Use a rack in the canner to prevent jars from directly touching the bottom.
Storage Tips
After canning, let the jars cool on a towel. Check the seals by pressing the lids; if they don’t pop back, the seal is secure. Store the jars in a cool, dark place for up to a year. Once opened, keep the jelly in the refrigerator and consume it within a few weeks.
FAQs About Cherry Jam and Jelly
Can I Use Frozen Cherries?
Yes, frozen cherries are a fantastic option when fresh cherries are unavailable. Thaw them completely and use them as you would fresh cherries. They may release extra juice, which can enhance the flavor of your jam or jelly.
How Much Sugar Should I Use?
Most recipes call for an equal amount of sugar to cherry juice or pulp (e.g., 4 cups of sugar for 4 cups of juice). If you prefer a lower-sugar option, use a low-sugar pectin.
Why Is My Jelly Cloudy?
Cloudy jelly usually results from pressing the jelly bag too hard during straining. To avoid this, let the juice drip naturally. While cloudy jelly may not look as pretty, it’s still perfectly safe and delicious.
How Long Does Cherry Jelly Last?
Properly canned jars of jelly can last up to one year in a cool, dark pantry. Once opened, store them in the refrigerator and use them within three weeks.
FAQs About Cherry Jelly
What is the difference between cherry jelly and jam?
Cherry jelly is made from strained juice, resulting in a smooth and translucent texture. Jam, on the other hand, contains the fruit’s pulp, giving it a thicker and chunkier consistency.
Is cherry high in pectin?
Tart cherries are naturally high in pectin, making them ideal for jelly-making. Sweet cherries, however, have lower pectin levels and typically require added pectin to achieve the desired texture.
What can I make with cherry pits?
Cherry pits can be used to create cherry pit syrup, a fragrant addition to cocktails and desserts. Alternatively, they make excellent potpourri or can be used in DIY crafts.
How do you thicken cherry jelly?
Thicken cherry jelly by ensuring it reaches the correct temperature (220°F) during cooking. Adding commercial pectin can also help achieve the perfect consistency.
Does lemon juice thicken jelly?
Yes, lemon juice contributes to thickening jelly by providing the necessary acidity to activate pectin. Additionally, it enhances the flavor by balancing the sweetness of the sugar.
Why won’t my cherry jelly set up?
If your jelly doesn’t set, it may be due to insufficient pectin, undercooking, or an incorrect sugar-to-juice ratio. Re-boiling the jelly with additional pectin or sugar often resolves this issue.
Conclusion
Crafting the perfect cherry jelly recipe is both an art and a science. With detailed steps, flavor variations, and expert tips, you’re now equipped to create a jelly that’s not only delicious but also versatile. Whether you enjoy it as a breakfast spread, a savory glaze, or a dessert enhancer, homemade cherry jelly is sure to become a staple in your kitchen. Experiment with the ideas in this guide, and let your creativity shine.